Getting Started
With CareAlign
Welcome to CareAlign! CareAlign is a HIPAA-compliant task management platform that optimizes how clinicians manage tasks and to-do items, decreases communication gaps, improves data visualization, and easily generates clinical documentation.
Below you can find tips and tricks for getting started with CareAlign. Have questions not answered here? Email us at info@carealign.ai, or use the chat function on our website, which is located in the bottom right corner.
Creating and Adding a List
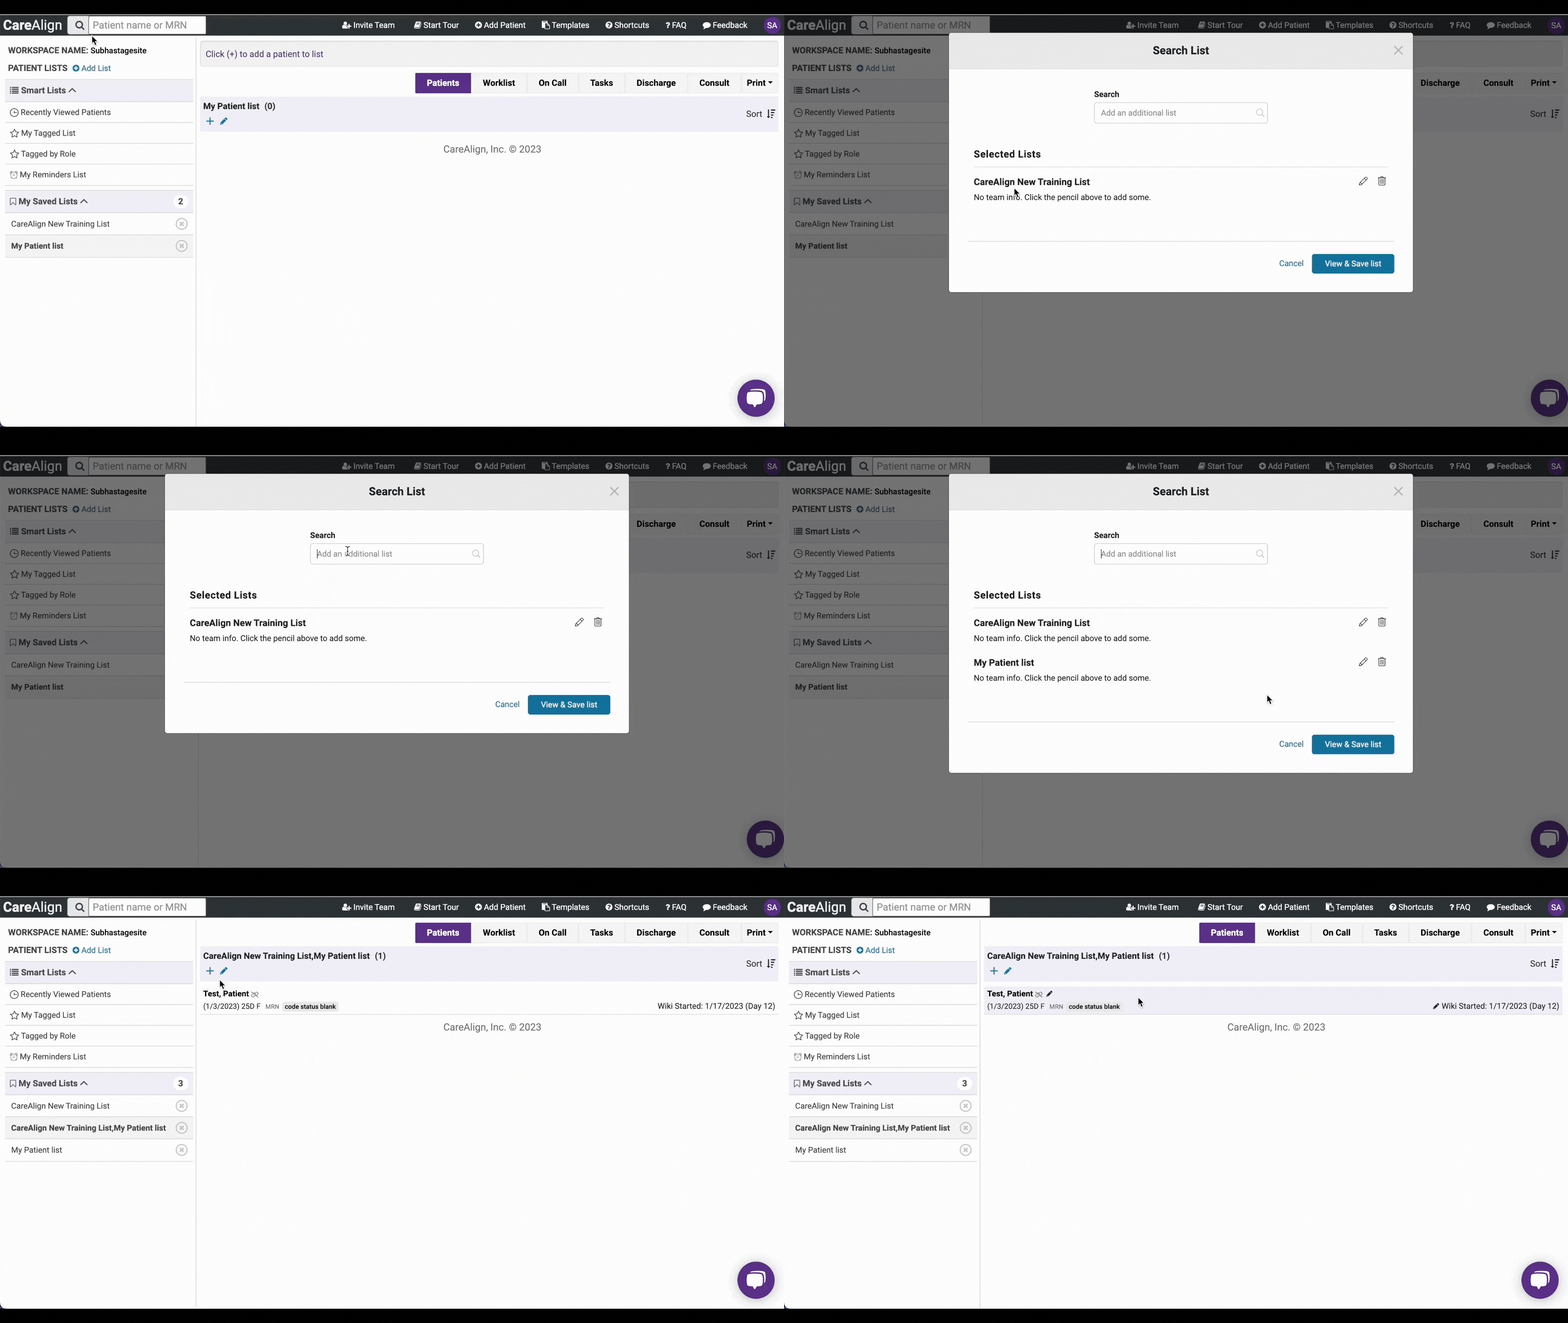
To create or add a patient list, click the Add List button on the left of the home screen. You will be prompted to search for any existing lists or create a new one. When you create a new one, you are able to name it whatever you like! CareAlign users typically have structures to how they want to organize their lists. For example, if you have a primary list of your entire patient panel, you can then create lists to organize your patients based on metrics like HgbA1c or blood pressure. Please reach out if you want help developing a plan for this.
Creating a Combined List View
Adding Patients To Your List
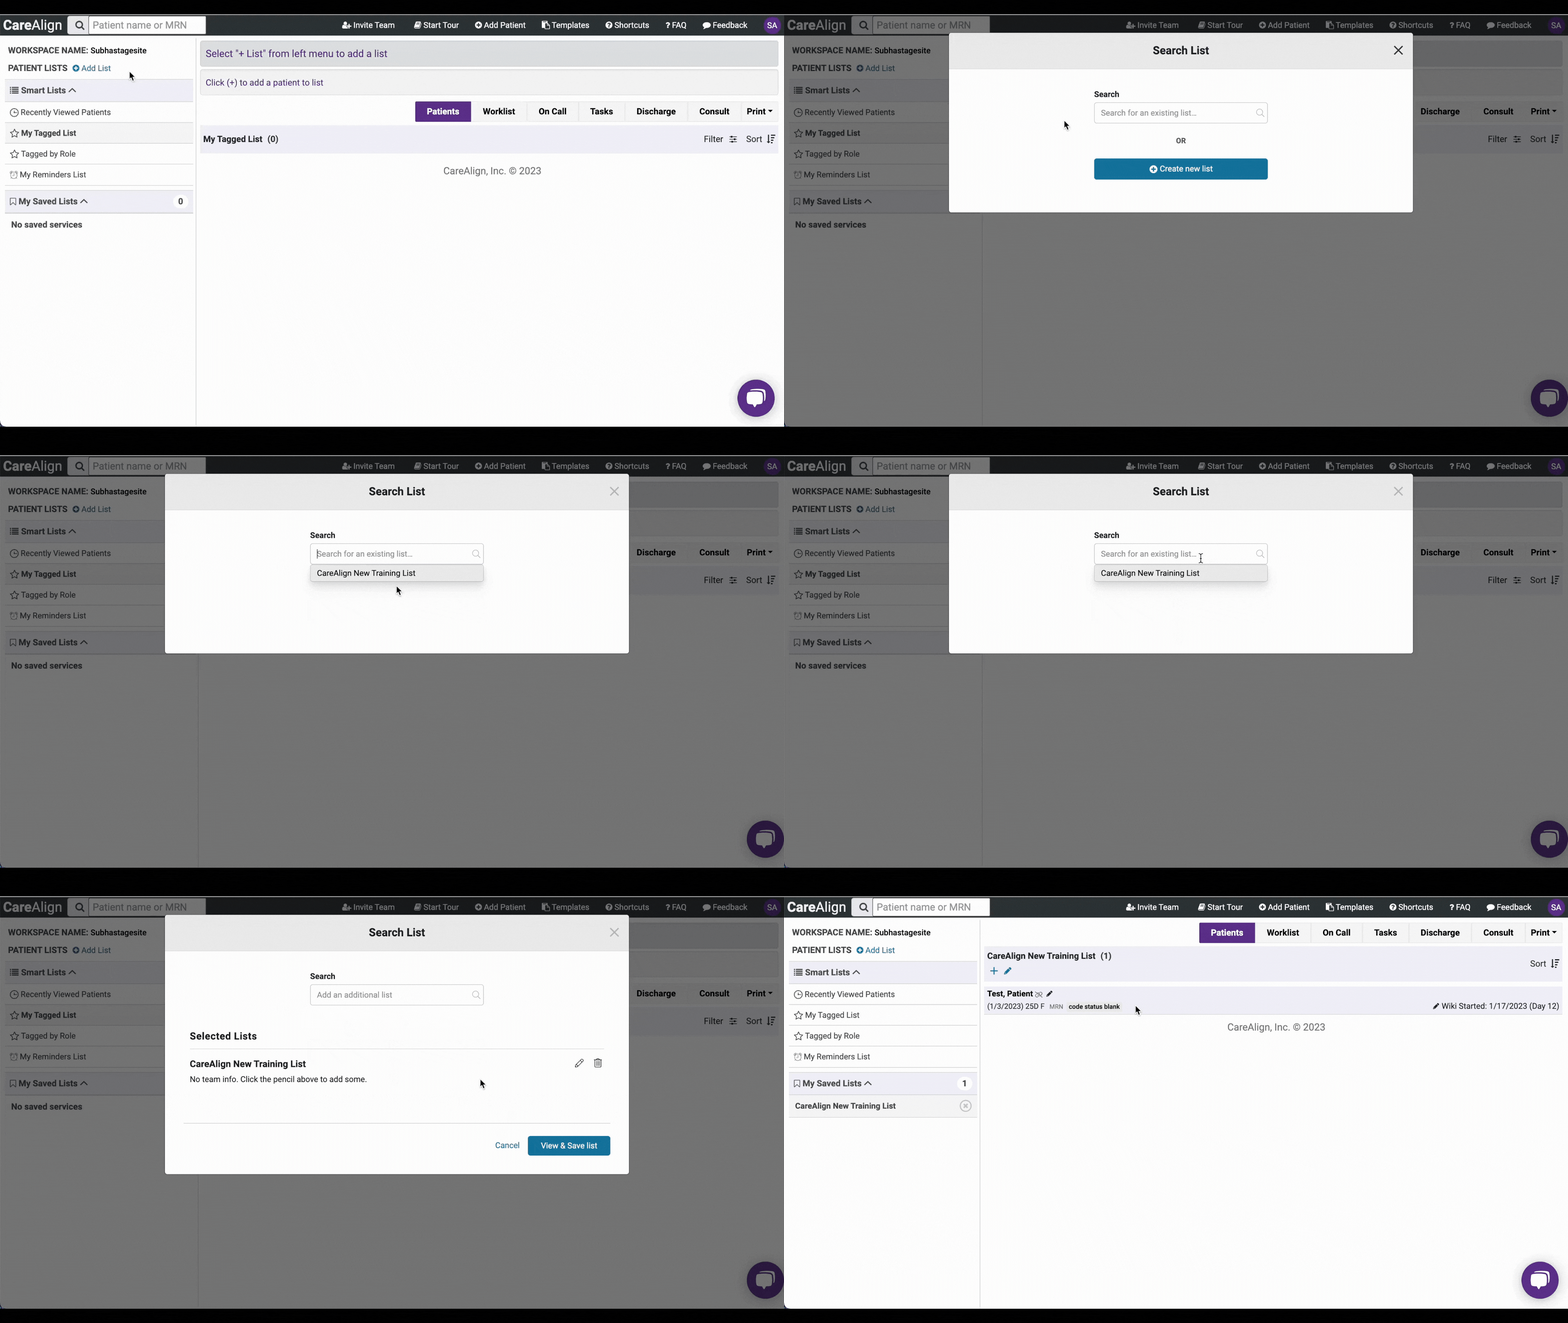
Adding an Existing Patient
To find an existing patient and add them to your list, click the “+” icon right under your patient list name. When the modal pops up, type their last name and first name, and click “search”. If a patient exists, they will be listed below with either a “wiki start date” or a “start wiki” button. To add the patient to your list, click the link/button. This will bring up the “edit wiki” modal. Here, you can search for your list.
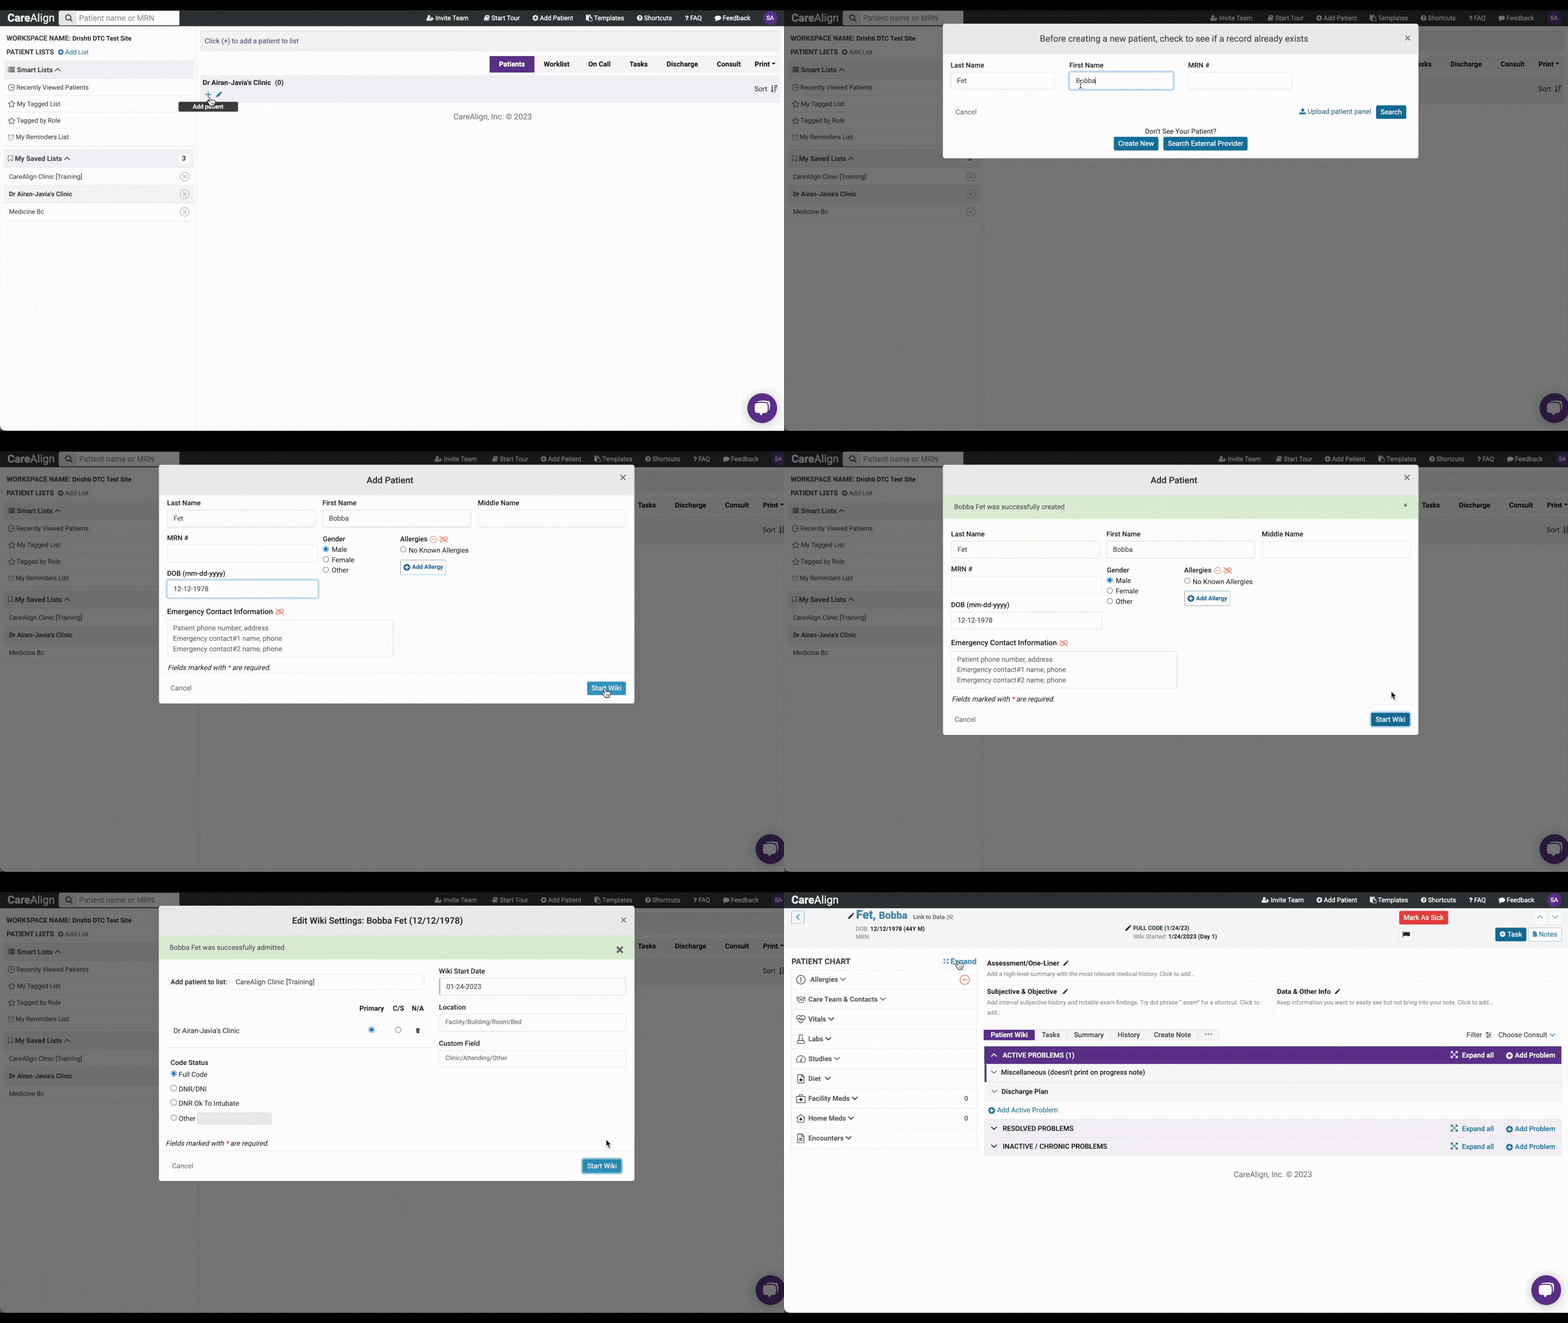
Adding an individual patient
To create a new patient or add an existing patient to your list, click the + icon right underneath your patient list name. When creating a new patient, begin by adding their full last name and first name, then clicking search. CareAlign will first look for an existing patient, then if one does not exist, you will have the option to “create new patient”.
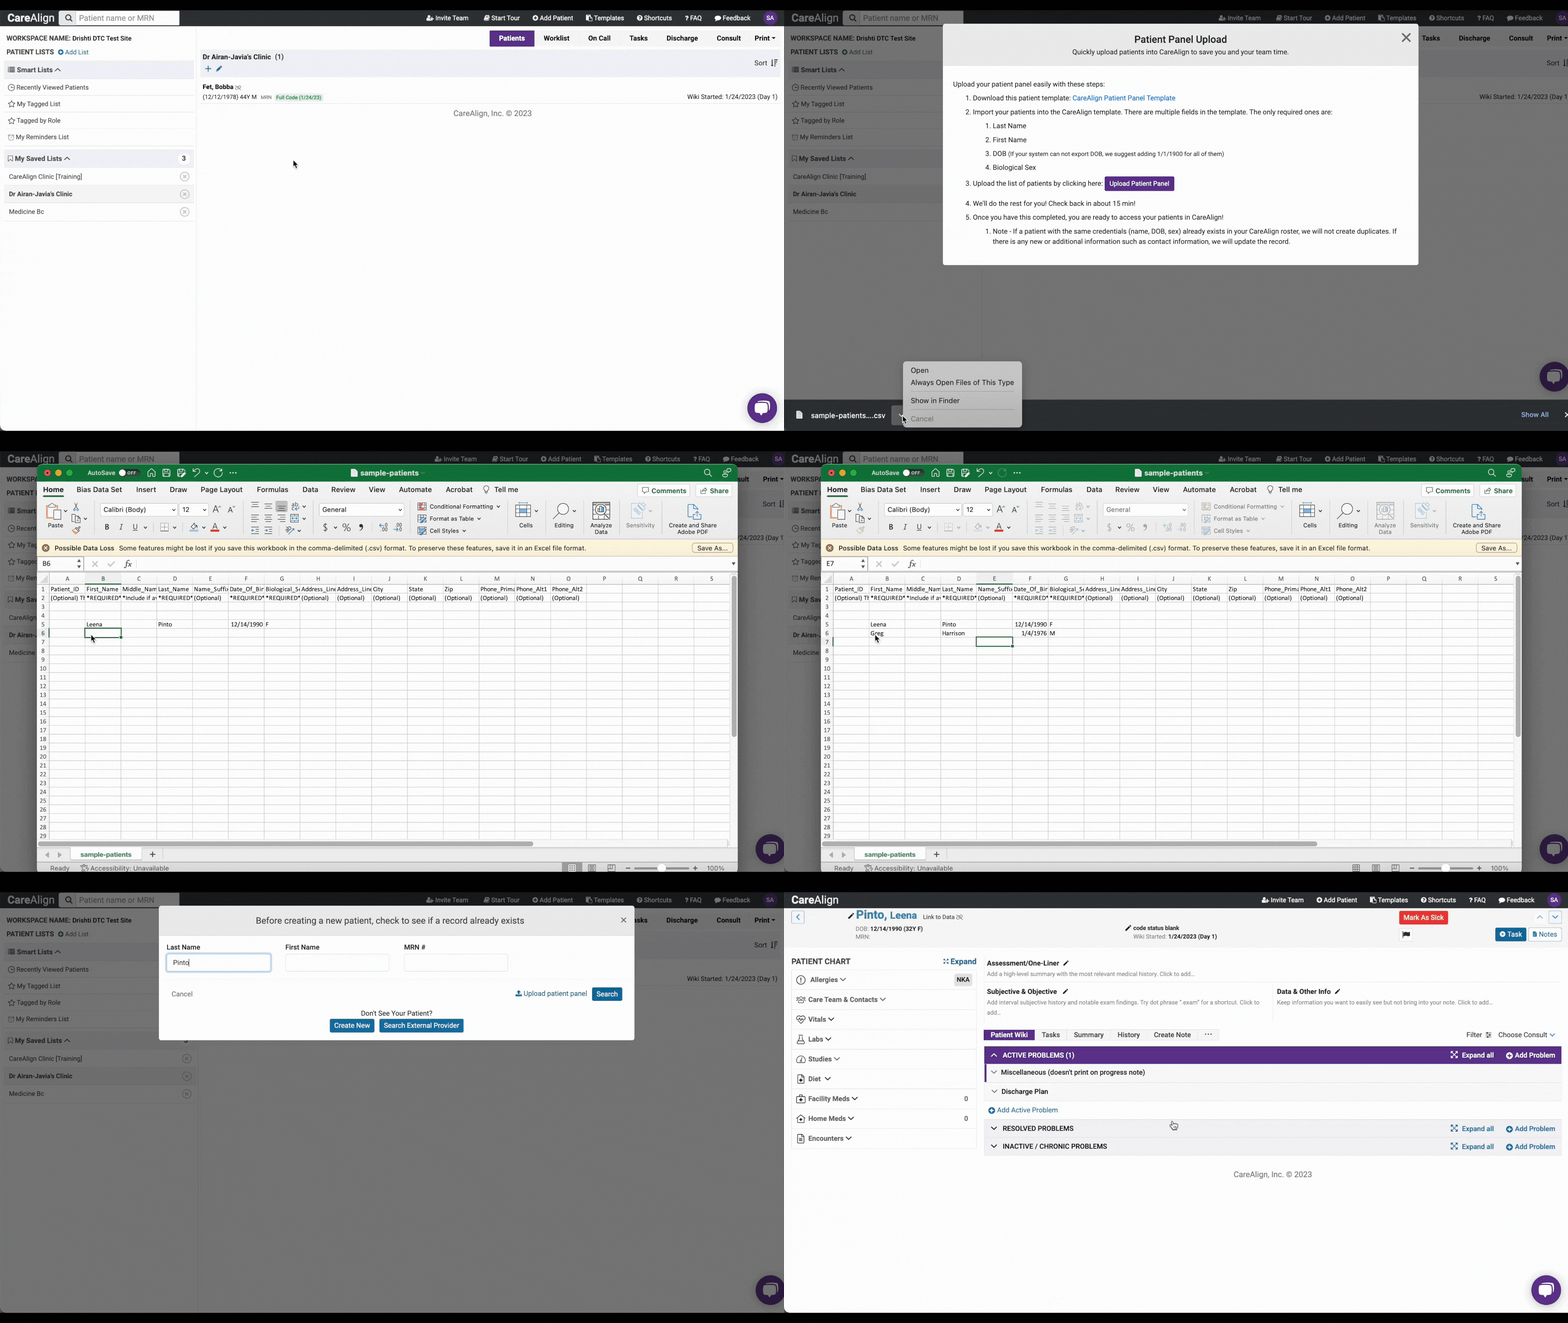
Using the Bulk Patient Uploader
Rather than creating one patient at a time, easily upload your entire panel at once! After clicking the + icon under your patient list name, you will see a text link that says “Upload patient panel.” Follow the detailed instructions to appropriately upload your patients. We also provide a template to help make uploading your patients as simple as possible!
Moving Patients to Different Lists
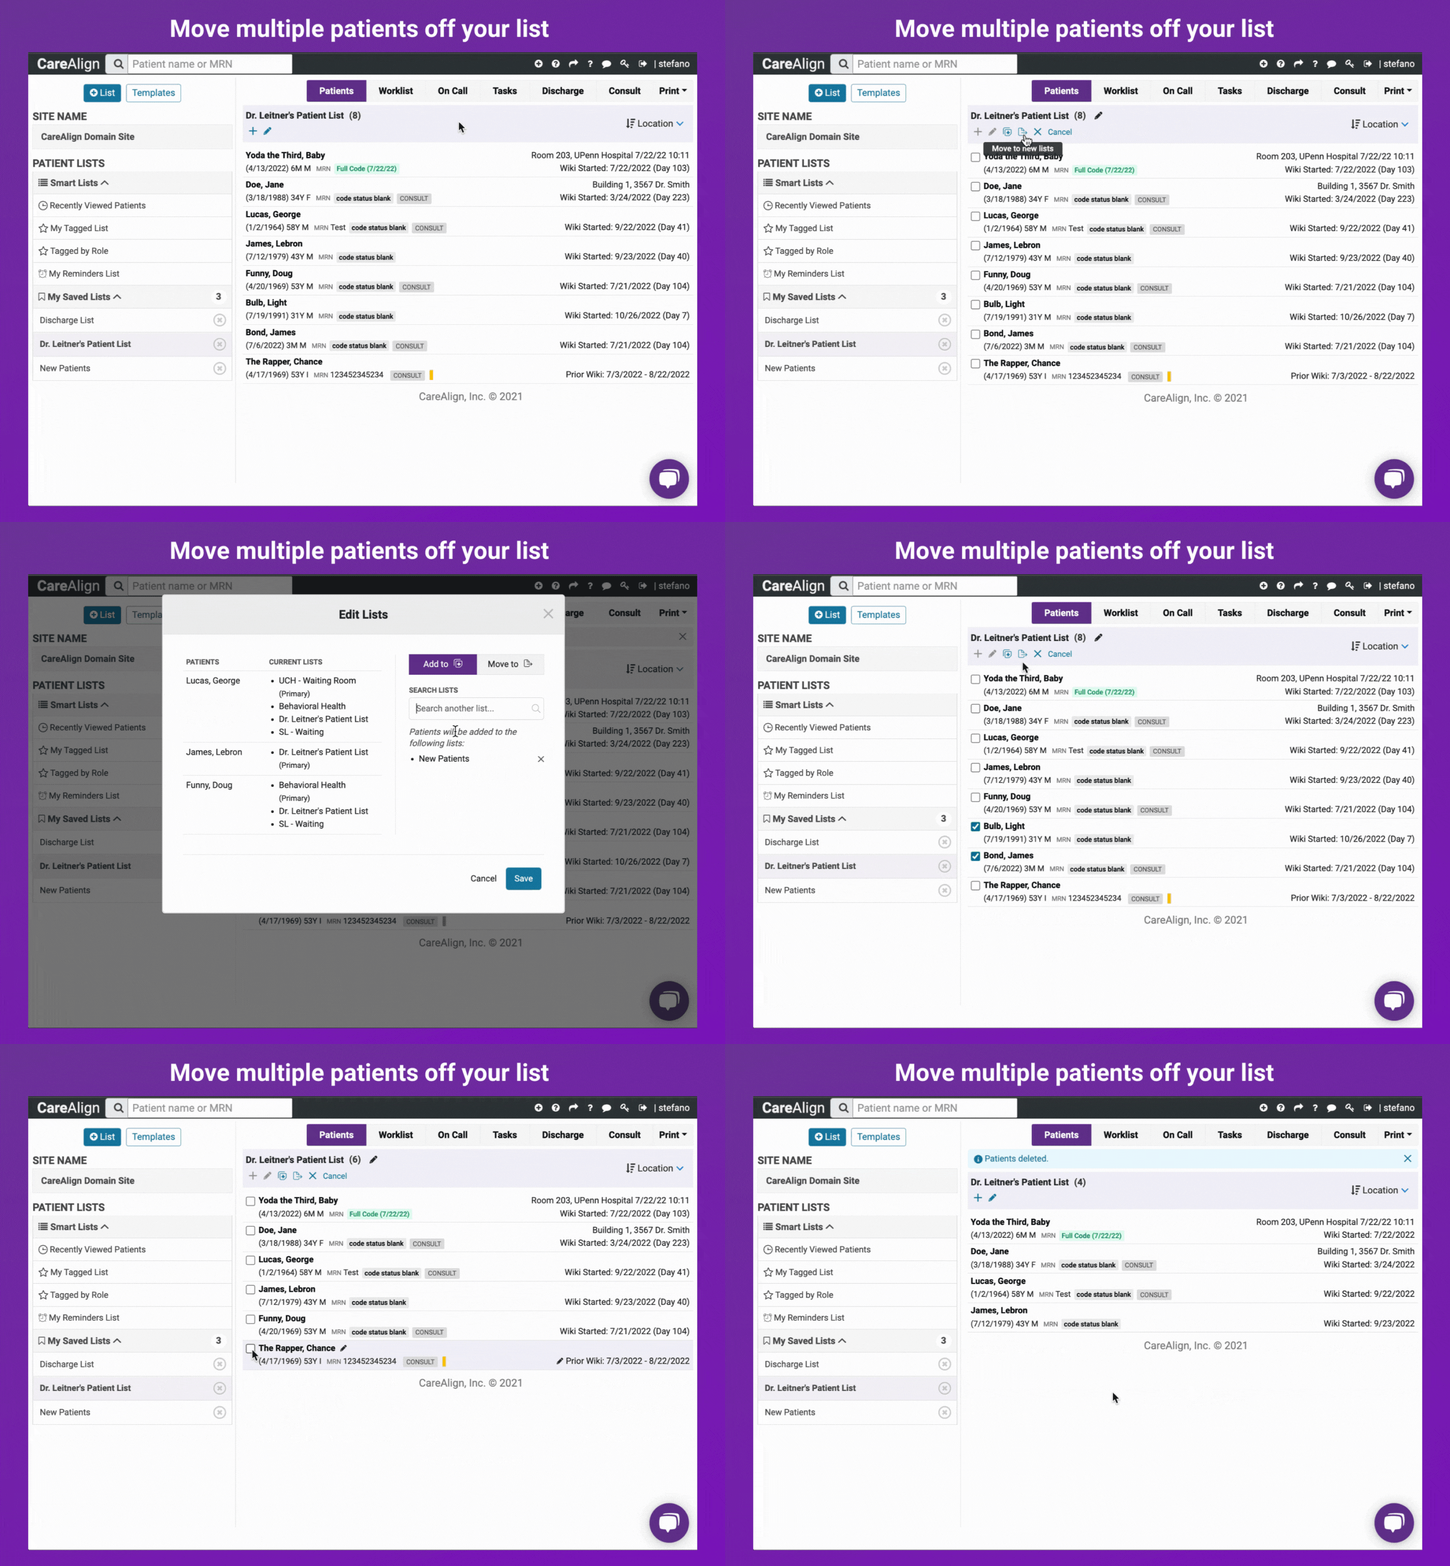
You may want to move multiple patients to different lists, such as taking your list primary patient panel and organizing lits based on metrics such as HgbA1c or blood pressure. In CareAlign you can move multiple patients between lists with just a few easy clicks!
To activate this, click the pencil “edit” icon right under your list name. You will immediately see multiple icons appear which are only activated if you select at checkbox next to a patient’s name. First is the “add to another list” icon, which allows you to add the selected patients to another list (or multiple other lists), while keeping them on your own. Next is the “move to new list” icon, which allows you to remove the selected patients off of your list and onto a different (or multiple different) lists. Last is the “remove from this list” icon, which allows you to remove the selected patients off your list and sends them back to the cloud, or just leaves them on any other list that they are on.
Edit Patient from List
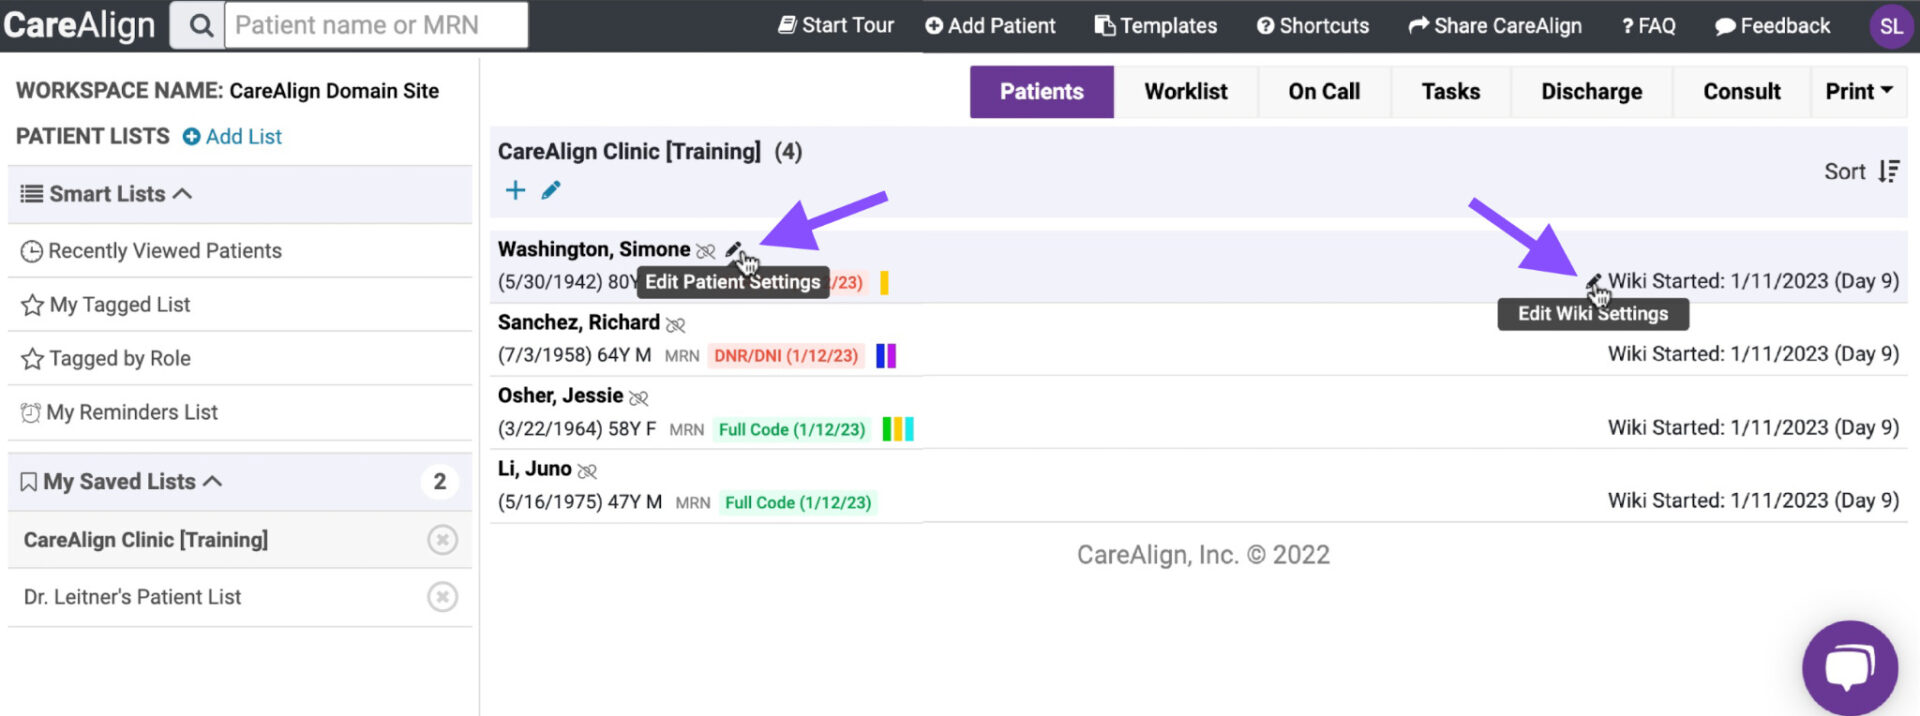
When you hover over any patient, you will see two edit pencil icons appear. If you ever need to update a patient’s demographic information, emergency contacts, or allergies, click the “Edit Patient Settings” pencil icon to the right of the patient’s name. If you need to update the patient’s code status, location, or add to the custom field, click the “Edit Wiki Settings” to the left of the Wiki date.
Using CareAlign in Worklist Mode
To the top right of your patient list you will see various tabs which are different ways of viewing your patient information and patient care task management. Begin by clicking Worklist and you will see each patient’s name expanded with more clinical information:
-
- Assessment/One-Liner: Clinical one-liner to help you and other care team members get quickly familiarized with the patient
- Data & Other Info: Notes that you and other team members can see, but will not be part of any clinical documentation
- Important Patient Information: Important patient information, otherwise known as anticipatory guidance. These are things you do not want to get missed, especially with information for shift changes.
- Task: Your to-do list where you can manage and keep track of all patient care tasks. All members can add to this! Whether you are the intern on the medicine team managing which labs to order, the nurse dispensing medication, or the social worker completing a follow-up call, all tasks associated with caring for each patient can be added and followed here.
Adding Assessment, Plan, and Tasks
If you click the areas that say “Click to add” under the Important Patient Information section or Tasks section, you can quickly contribute to the patient care plan. When adding these, simply type and click enter. The next screen allows you to further customize what you entered, including assigning it to a clinical diagnosis, assigning colored flags, or adding an indication that the information is pertinent to discharge planning.
After adding important information or a task, you can double-click what you added to edit or update.
As you complete tasks off your list, you can mark a task as completed by simply clicking the checkbox next to the task.
Task Management Overview
Watch this video to get an overview of using task management in CareAlign.
Viewing All of Your Patient Care Tasks at Once
Sometimes you just need to get things done! If you already know your patients and don’t need to review the the One-Liners or Important Patient Information for your patients, you can view only your tasks by clicking the ‘Tasks’ tab while in your patient list. When you are in this view, you are able to view all tasks for your patients. Each task ends with the the patient’s last name and first initial to help you identify which patient the task is for. When you finish a task, click the checkbox to indicate that it is complete! In the top right of the screen, you can click ‘Clear Completed Tasks’ to remove these completed tasks.
Please note that in the Tasks view, you cannot add tasks. However, you can double click on a task and edit it! This includes the ability to tag user and set reminders.
Tag Users, Tag By Role, Set Reminders
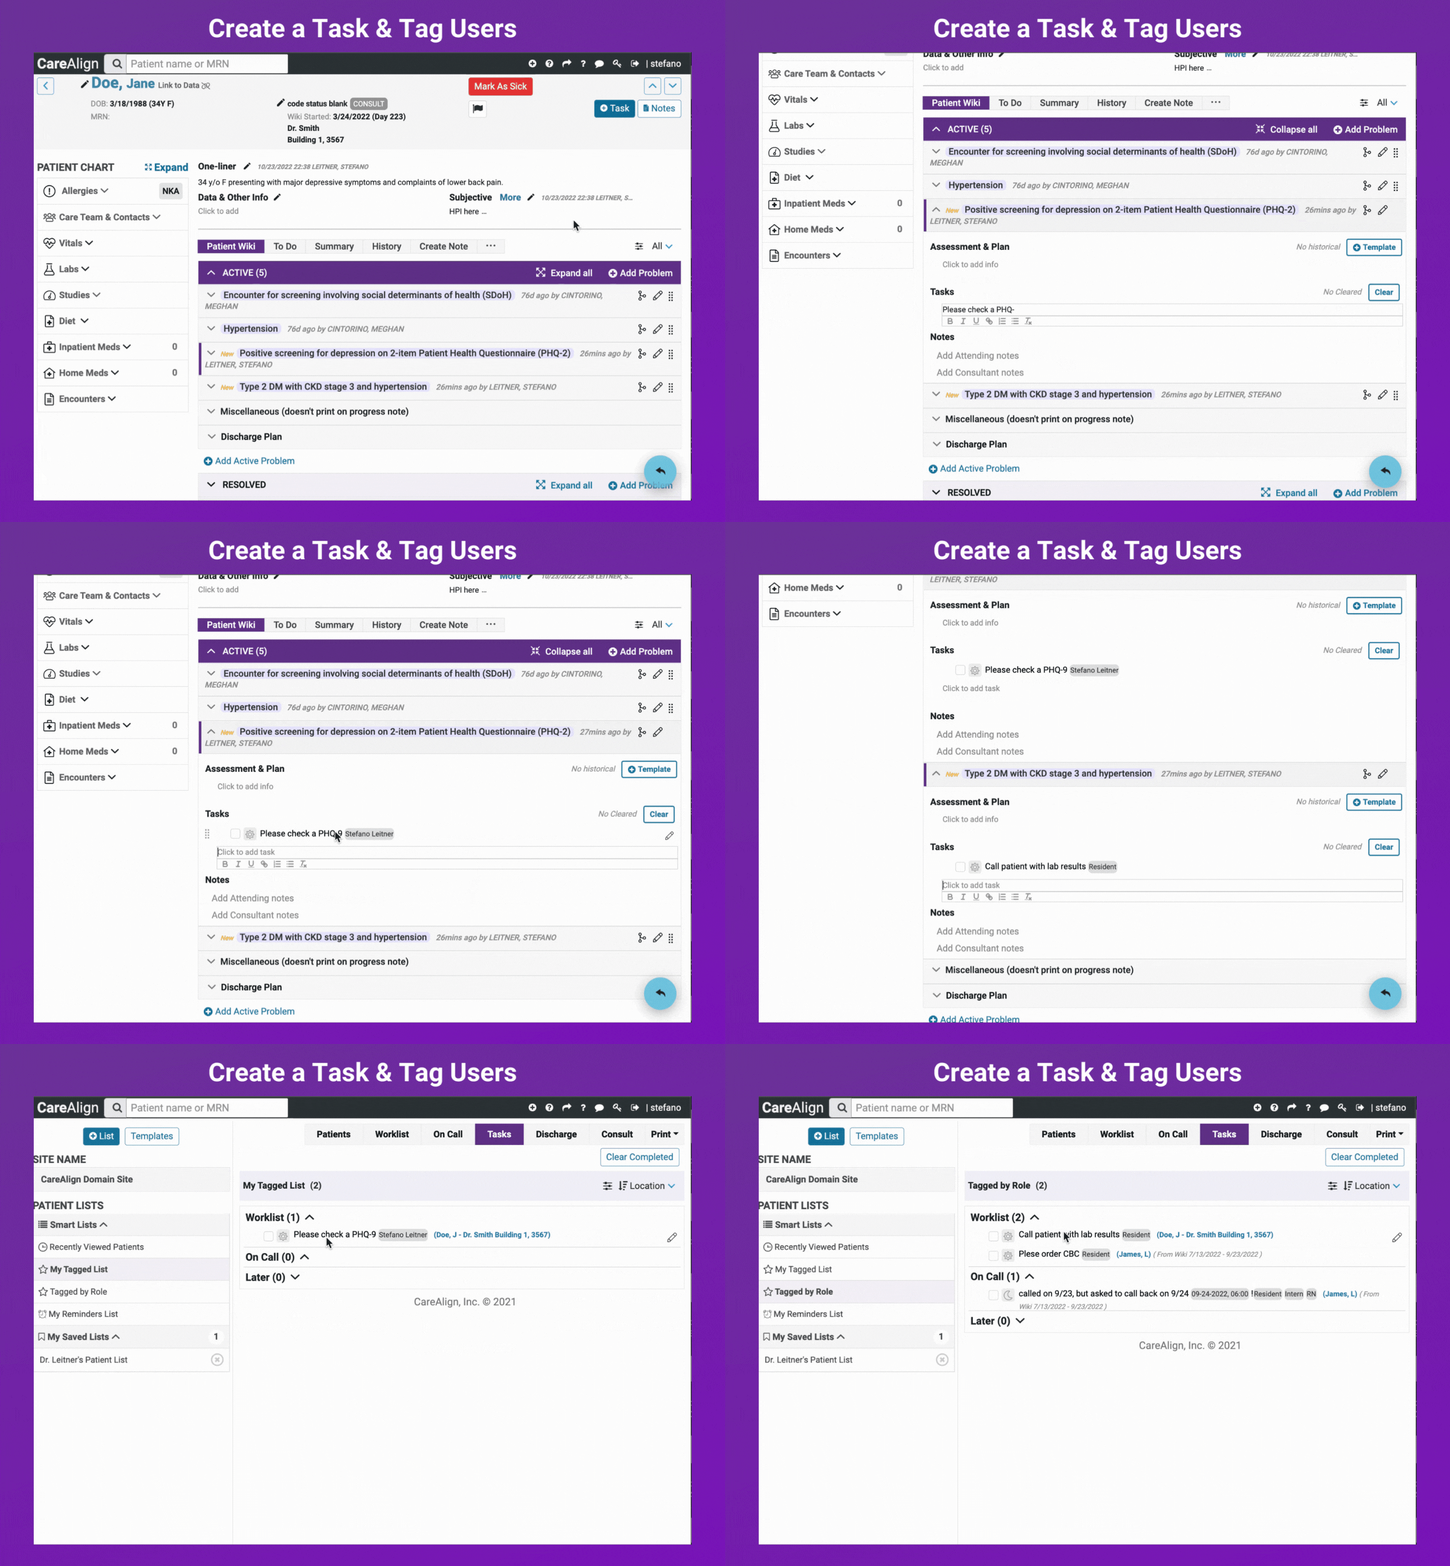
CareAlign allows users to tag team members to different tasks so there is no gap in communication. You can tag individuals by name and it will go directly to them. Don’t know which individual to assign a task to? You can tag by role so that anyone in that role sees the task. You can also set reminders for tasks to be done at a later time or date.
- Tag Users: When tagging individual users in tasks, begin by typing the @ symbol, followed by their name. For example, @Sara Ramirez will directly tag Sara and show up in her “My Tagged List” Smart List. Any patient that an individual is tagged in will show up in that person’s “My Tagged List”. Quick tip: you can tag yourself, too!
- Tag Roles: When tagging roles, begin by typing the @ symbol, followed by the role. For example, @Resident will send that tag to anyone who signed up for CareAlign under the role “resident.” Similarly, you can tag @RN, @Pharmacist, @Social Worker, and much more! Any patient tagged by role will show up in the user’s Tagged by Role Smart List.
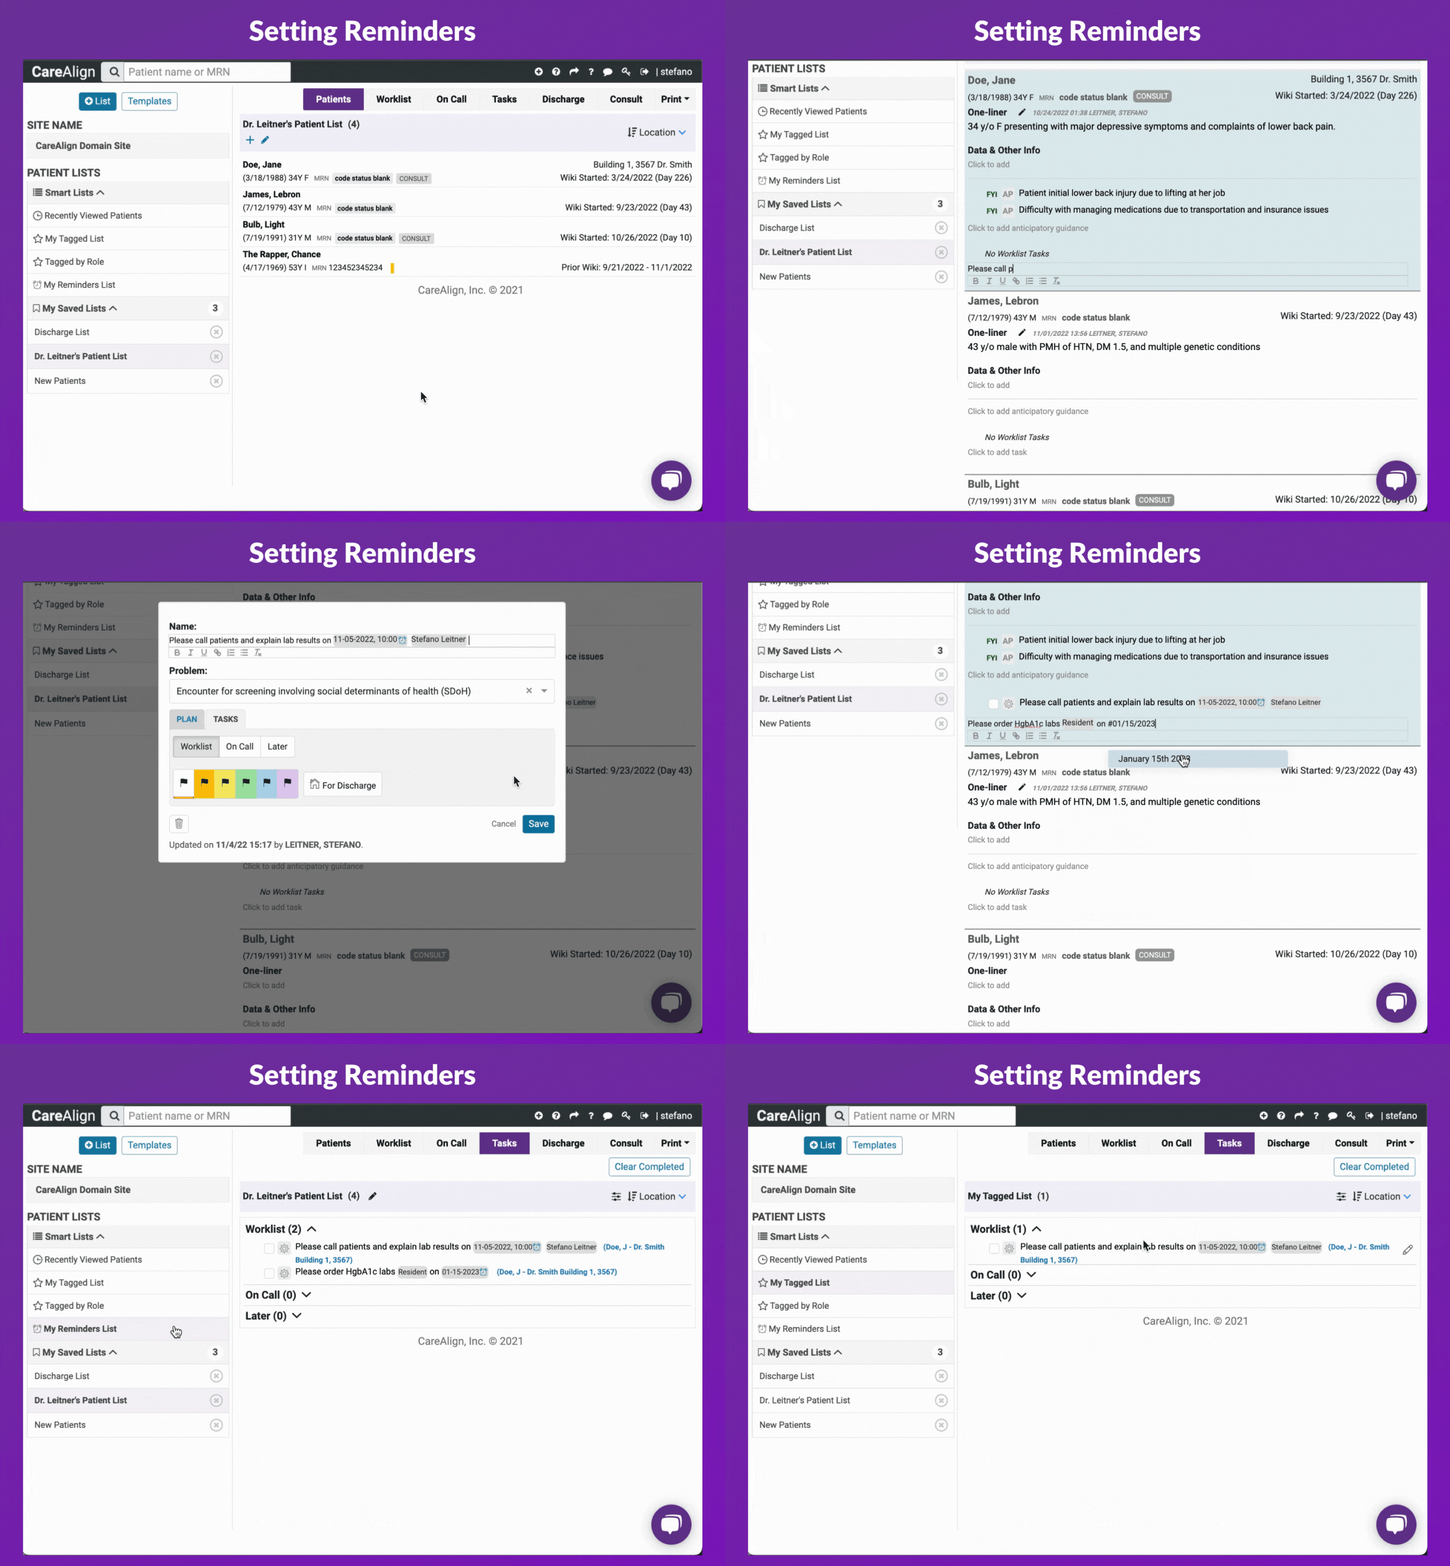
- Set Reminders: To set a reminder begin by typing the # symbol followed by either a time or date. If you begin by typing #10 it will populate 10am today and 10am tomorrow, giving you the option to choose. If you have to set a reminder for a later date, type the date format such as MM/DD. #11/21 should populate as November 21. To set a reminder email, double-click your newly added reminder and when you see the calendar, click the “Remind” row and select when you would like a reminder email sent. Any patient with a reminder that you set will show in the “My Reminder List”.
Smart Lists
Smart Lists are dynamic lists that automatically organize patients for you. Using Smart Lists, you can easily keep track of recently viewed patients all in one list. Were you tagged in a task or had a reminder time set? The Smart Lists section has dedicated lists of the patient care plans you were tagged in or have a set reminder for. My Tagged List will include all patients that you were tagged in. Tagged by Role will include all patients that your role was tagged in (for example, all patients that were tagged with “Attending”). My Reminder List will include all patients that you have set a reminder for.
Inside the Patient Wiki (AKA the patient chart)
What is a Wiki? We use the term Wiki when referring to a patient’s chart. Unlike other clinical software, CareAlign seamlessly enables collaboration and communication among all members of a patient’s care team, all within the patient’s Wiki. Rather than each member of a care team adding their own updated notes, CareAlign functions to work as a living, breathing patient care plan where all members of the patient’s care team can collaborate to care for the patient. Think of this like a Google doc or Wikipedia page, where multiple people are able to collaborate and contribute.
Use CareAlign in Problem Based Mode
After adding clinical problems, you are able to organize your assessments, plans, and patient care tasks through a problem-based approach. While in the patient’s chart, you will see each diagnosis added under the “Active Problems” banner. If you click on a problem, you will see dedicated locations for the assessment & plan, and tasks. Just like in the worklist mode, here you are able to quickly add information to optimize your patient care plan. Additionally, you are able to tag users, tag roles, and set reminders from here.
After coordinating your assessment & plan, you are able to view your patient’s wiki in a task-focused view. Simply click the tab “Tasks” to see all patient care tasks added to the patient’s wiki.
Generate A Clinical Note
Time to write the note! In order to generate a note, you have to be in a patient’s wiki. To get the most out of generating a note, you would most benefit from the problem-based approach that has assessments & plans per problem.
To create a note, click the tab that says “Create Note.” You will first be prompted to have your note be in the APSO format (Assessment, Plan, Subjective, Objective) or the standard SOAP format (Subjective, Objective, Assessment, Plan). Next, you are asked which data from the care plan you want to add to your note. You can check off problems that you do not think are relevant to that particular note (for example, perhaps certain diagnoses are unnecessary to include in a note being shared with an external sub-specialist). Once ready, click “Generate Note”.
The next screen will be the text-based note. This is where you can easily copy/paste your note into an electronic medical record. To quickly copy the entire text, click “Copy Text” in the bottom right.
To save the note, click “Sign & Save”. You will see various options to customize your note, including changing the note title, date and time of service, and your own credentials. It is currently set to default as a Progress Note with the current date and time, and the credentials you signed up with. If you only want to view the note within CareAlign, simply click “Save to CareAlign”. If you want to share the note or export it from CareAlign, click “Save & Share” and read the next instructions.
Viewing History
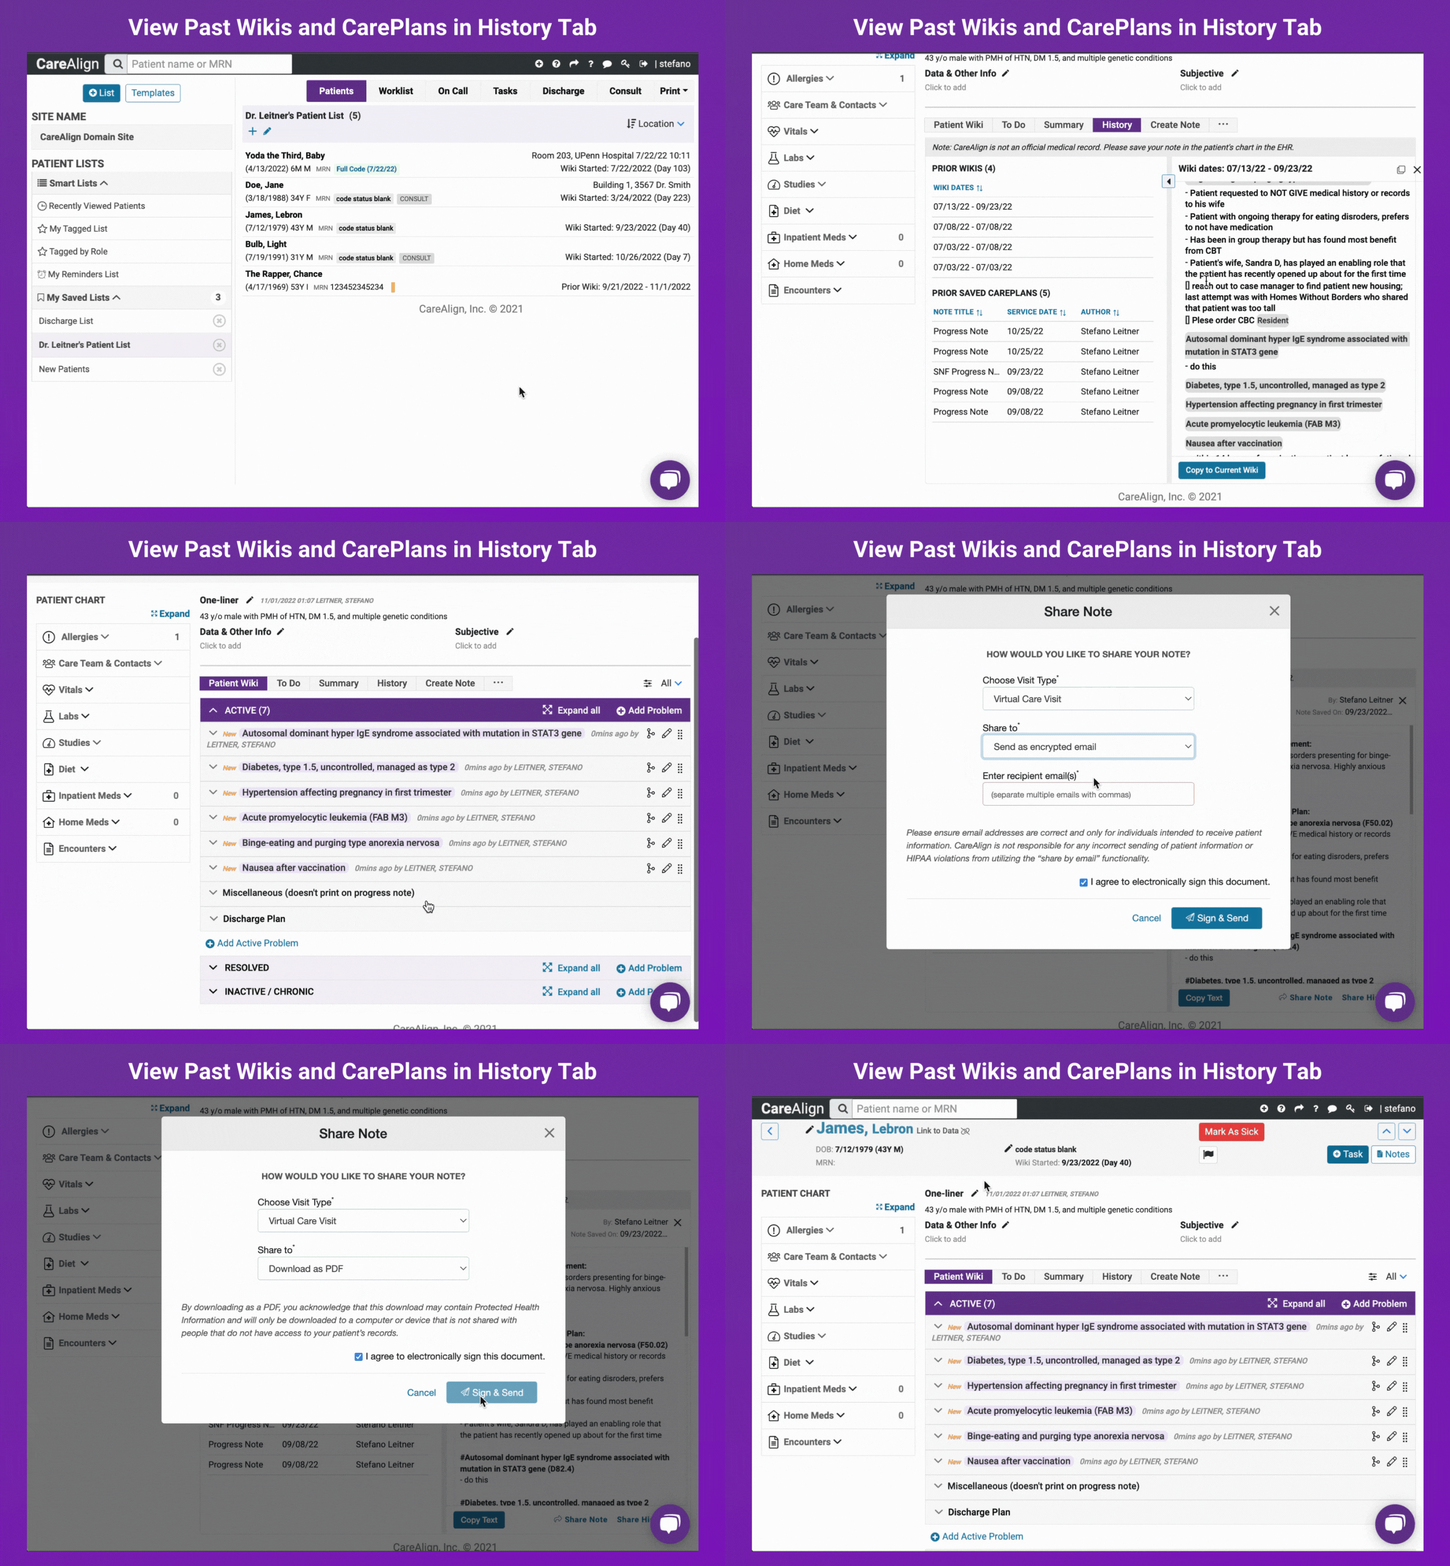
Once you save a note, you can always go back to view it, download it, and share it. Within the patient wiki, click the tab titled “History”. Here you will see any notes under “Prior Saved CarePlans”. When you click on any note, you can see everything that was saved within that note. You can even copy the text, share the note, or view history of how it was previously saved.
Additionally under this section you will see ‘Prior Wikis.’ This is where previous care plans will save if you end a patient wiki.
Invite Team Members
Expand your team within CareAlign! If you are the main admin working with CareAlign, you can easily invite team members to join your workspace by clicking ‘Invite Team’ in the top banner of CareAlign. From here, you simply input their email addresses (separated by commas) and click invite. They will each receive an email invitation allowing them to create user profiles with access to your clinical workspace. If you run into any issues, please contact us at help@carealign.ai.
If you are not the main admin working with CareAlign but still want to invite team members, please contact your main admin.
Discharge Planning
CareAlign lets you work on your care plan whether your patient is admitted or discharged. There are two ways to do this: from the Worklist view or with Problem-Based mode. Regardless of how you add information for discharge planning, you will always see a tiny home icon next to anything added for discharge planning. Add something and see what we mean.
Worklist view: While in your patient list, click on the tab titled ‘Discharge.’ Just like the Worklist view, the Discharge view has basic patient demographics, the one-liner, and expanded information important to your care plan. Rather than calling it “Important Patient Information”, here it is called “Transition Planning Information”. This section should be the assessment and plan related to discharging the patient. Additionally, the tasks section should be all tasks related to discharging the patient.
Problem-Based mode: From within the patient’s chart, you can add to the discharge plan simply by following the previous instructions for adding the assessment, plan, and tasks. However, to assign them for discharge planning, you have to do one extra step. When adding to the Assessment & Plan section, click the AP button next to each data point and select “For Discharge”. Similarly, when adding to the Tasks section, click the edit gear icon next to each to-do item and select “For Discharge”. For both of these, you should see a tiny home icon appear indicating that this is for discharge.
Discharge A Patient
When a patient is discharged from the hospital or discharged from your outpatient clinic, you have a few options for your workflow.
The simplest thing to do would be to remove them from your active patient list. To do this, follow the instructions above about removing a patient from your list or moving them to another list. Remember, removing them from your list does not delete them from CareAlign! Their care plan and information will always be stored and easily found by searching for the patient.
The second option is to end their wiki – that is to end their clinical encounter and current care plan shared by all providers. This step is generally unnecessary but is useful if you anticipate needing to start a new care plan from scratch the next time you see this patient. There are two ways to do this. From the patient list view, hover over the patient’s name and click the “edit” pencil icon next to ‘Wiki Started:’ on the right-hand side of that patient’s highlighted row. Once selected, click to “End Wiki”. You will be asked where the patient was transitioned to and if they are deceased, then you confirm to “End Wiki”. Similarly, you can end the wiki from directly within the patient’s chart by clicking where it says the patient’s code status and wiki start date in the top banner. After clicking that, follow the same instructions as above.
Data Visualization
On the left-hand side of each patient chart is a section to view vitals, labs, and much more. To view the information here and get the most out of CareAlign, you will have to connect to your electronic medical record. Once connected, CareAlign gives you a user-friendly and intuitive way of viewing all objective data. From trending vital signs to lab work, to reviewing active medications and insurance information, CareAlign becomes a tool that lets you optimize your clinical efficiency and care coordination, so that you can spend your time doing the things that matter most to you. Please contact us if you are interested in connecting to your EMR and unlocking this feature.

